
使用原生安卓系统的用户经常担心 view hierarchy 工具会让安卓应用 UI 开发变得很复杂,其实使用 Jetpack Compose 就可以完美解决这个问题,而且 Jetpack Compose 使用的语言是多数安卓开发人员都熟悉的 Kotlin。
Jetpack Compose 是一个 reactive UI 工具包,能简化并加快 UI 开发。如果你熟悉 Flutter 和 React,就会发现 Jetpack Compose 框架跟它们非常相似。
在下面的教程里,我们会使用安卓版声网 SDK 和 Jetpack Compose 框架搭建一个视频直播推流应用(安卓sdk),用户可以以主播或者观众的角色加入直播推流频道。
前期准备
项目设置
1. 打开 Android Studio,创建一个新项目,并选择 Empty Compose Activity 模板:
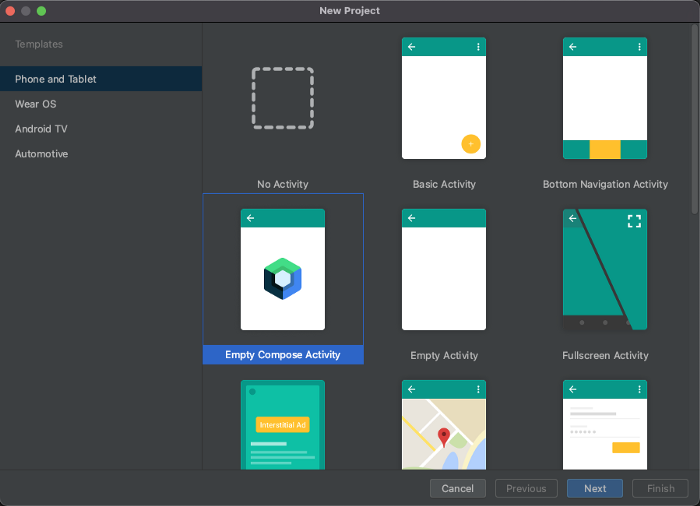
2. 为创建的应用命名并点击 Finish。
3. 在 app 目录下的 Gradle 文件中添加下列依赖:
implementation "androidx.compose.material:material-icons-extended:$compose_version"
implementation 'io.agora.rtc:full-sdk:3.5.0'
4. 在 AndroidManifest 文件中添加相关权限。
<uses-permission android:name="android.permission.INTERNET" />
<uses-permission android:name="android.permission.CAMERA" />
<uses-permission android:name="android.permission.RECORD_AUDIO" />
<uses-permission android:name="android.permission.MODIFY_AUDIO_SETTINGS" />
<uses-permission android:name="android.permission.ACCESS_WIFI_STATE" />
<uses-permission android:name="android.permission.ACCESS_NETWORK_STATE" />
<uses-permission android:name="android.permission.BLUETOOTH" />
一切就绪!现在我们来搭建应用。
搭建登录页面
我们会在登录页面设计一个简单的 UI,目的主要是获取以下信息:
- 读取用户输入的字符串作为频道名称。
- 通过单选按钮读取用户角色(主播或观众)。
val channelNameState = remember { mutableStateOf(TextFieldValue()) }
val userRoleOptions = listOf("Broadcaster", "Audience")
val (selectedOption, onOptionSelected) = remember { mutableStateOf(userRoleOptions[0]) }
Column(
  modifier = Modifier.padding(horizontal = 10.dp),
  verticalArrangement = Arrangement.Center,
) {
  TextField(
    value = channelNameState.value,
    onValueChange = { channelNameState.value = it },
    label = { Text("Channel Name ") },
    placeholder = { Text("test") },
    modifier = Modifier
                .align(
                    alignment = Alignment.CenterHorizontally
                )
                .fillMaxWidth()
  )
  Spacer(modifier = Modifier.height(16.dp))
  userRoleOptions.forEach{ text ->
    Row(
      Modifier
        .fillMaxWidth()
        .padding(horizontal = 10.dp)
        .selectable(
          selected = (text == selectedOption),
          onClick = { onOptionSelected(text) }
        )
    )  {
      RadioButton(
        selected = (
          text == selectedOption
        ),
        modifier = Modifier.padding(
          horizontal = 25.dp,
          vertical = 10.dp
        ),
        onClick = {
          onOptionSelected(text)
        }
      )

      Text(
        text = text,
        modifier = Modifier.padding(start = 10.dp, top = 10.dp),
        fontSize = 18.sp
      )
    }
  }
}

Spacer(modifier = Modifier.height(80.dp))

Button(
  onClick = {
    val intent = Intent(context, VideoActivity::class.java)
    intent.putExtra("ChannelName", channelNameState.value.text)
    intent.putExtra("UserRole", selectedOption)
    ContextCompat.startActivity(context, intent, Bundle())
  },
  contentPadding = PaddingValues(
    horizontal = 20.dp,
    vertical = 10.dp
  )
) {
  Icon(Icons.Filled.ArrowForward, contentDescription = "Join", modifier = Modifier.size(24.dp))
  Spacer(modifier = Modifier.size(ButtonDefaults.IconSpacing))
  Text(text = "Join", fontWeight = FontWeight.Bold, fontSize = 18.sp)
}
搭建呼叫界面
搭建好登录页面之后就可以开始搭建呼叫界面。首先,要给摄像头和麦克风添加用户权限。这里我们要创建UIRequirePermissions 函数用来查看用户是否已授予摄像头和麦克风权限。
如果用户已完成授权,就将用户跳转至呼叫界面。如果用户还没有授权,我们就弹出提示框请求用户授权。
@Composable
private fun UIRequirePermissions(
    permissions: Array<String>,
    onPermissionGranted: @Composable () -> Unit,
    onPermissionDenied: @Composable (requester: () -> Unit) -> Unit
) {
    Log.d(TAG, "UIRequirePermissions: ")
    val context = LocalContext.current

    var grantState by remember {
        mutableStateOf(permissions.all {
            ContextCompat.checkSelfPermission(context, it) == PackageManager.PERMISSION_GRANTED
        })
    }

    if (grantState) onPermissionGranted()
    else {
        val launcher = rememberLauncherForActivityResult(
            contract = ActivityResultContracts.RequestMultiplePermissions(),
            onResult = {
                grantState = !it.containsValue(false)
            }
        )
        onPermissionDenied {
            Log.d(TAG, "launcher.launch")
            launcher.launch(permissions)
        }
    }
}
我们可以在VideoActivity 中调用UIRequirePermissions 函数。
private val permissions = arrayOf(Manifest.permission.RECORD_AUDIO, Manifest.permission.CAMERA)

class VideoActivity : ComponentActivity() {

    override fun onCreate(savedInstanceState: Bundle?) {
        super.onCreate(savedInstanceState)

        // Turn off the decor fitting system windows, which allows us to handle insets,
        // including IME animations
        WindowCompat.setDecorFitsSystemWindows(window, false)

        val channelName = intent.getStringExtra("ChannelName")
        val userRole = intent.getStringExtra("UserRole")

        setContent {
            Scaffold() {
                UIRequirePermissions(
                    permissions = permissions,
                    onPermissionGranted = {
                        if (channelName != null && userRole != null) {
                            CallScreen(channelName = channelName, userRole = userRole)
                        }
                    },
                    onPermissionDenied = {
                        AlertScreen(it)
                    }
                )
            }
        }
    }
}
根据用户权限状态将用户分别跳转至呼叫界面或提示界面。
提示界面
出现提示界面是为了获得用户的摄像头和麦克风权限。
@Composable
private fun AlertScreen(requester: () -> Unit) {
    val context = LocalContext.current

    Log.d(TAG, "AlertScreen: ")
    Box(
        modifier = Modifier
            .fillMaxSize()
            .background(color = Color.Red),
        contentAlignment = Alignment.Center
    ) {
        Button(onClick = {
            requestPermissions(
                context as Activity,
                permissions,
                22
            )
            requester()
        }) {
            Icon(Icons.Rounded.Warning, "Permission Required")
            Text(text = "Permission Required")
        }
    }
}
呼叫界面
如果用户同意授权,我们就把用户跳转到呼叫界面,我们在呼叫界面初始化声网 Android SDK 并设置好视频通话布局。
首先,创建一个变量 remoteUserMap,这个变量会把远端用户的 UID 映射到 TextureView 上:
var remoteUserMap by remember {
    mutableStateOf(mapOf<Int, TextureView?>())
}
声明这个变量后,我们可以创建 initEngine 函数,这个函数负责初始化安卓版声网Agora SDK 并为直播设置频道模式。
fun initEngine(current: Context, eventHandler: IRtcEngineEventHandler, channelName: String, userRole: String): RtcEngine =
  RtcEngine.create(current, APP_ID, eventHandler).apply {
    enableVideo()
    setChannelProfile(1)
    if (userRole == "Broadcaster") {
      setClientRole(1)
    } else {
      setClientRole(0)
    }
    joinChannel(token, channelName, "", 0)
}
我们在这个函数内根据登录页面的用户输入来设置用户角色吗。以上,我们完成了视频通话需要的所有设置。
接下来,为应用搭建 UI,这个应用的 UI 有三个主要组件:
- 本地用户视图
- 远端用户视图
- 用户控件(麦克风静音/静音取消,关闭/打开摄像头,挂断通话)
使用 Jetpack Compose 的 AndroidView 来搭建本地视图。AndroidView() 是一个可组合函数,我们可以用这个函数在 @Composable 函数内添加安卓视图。这样的话,我们就可以使用现有的安卓类函数,不必使用 compose 函数。
val localSurfaceView: TextureView? by remember {
  mutableStateOf(RtcEngine.CreateTextureView(context))
}

mEngine.setupLocalVideo(VideoCanvas(localSurfaceView, Constants.RENDER_MODE_FIT, 0))

localSurfaceView?.let { local ->
  AndroidView(factory = { local }, Modifier.fillMaxSize())
}
可以根据自己的需求来设置本地视图的样式,但是方便起见,我们把本地视图扩展为全屏,把远端用户视图呈滚动行显示在用户屏幕顶部。
@Composable
private fun RemoteView(remoteListInfo: Map<Int, TextureView?>, mEngine: RtcEngine) {
    val context = LocalContext.current
    Row(
        modifier = Modifier
            .fillMaxWidth()
            .fillMaxHeight(fraction = 0.2f)
            .horizontalScroll(state = rememberScrollState())
    ) {
        remoteListInfo.forEach { entry ->
            val remoteTextureView =
                RtcEngine.CreateTextureView(context).takeIf { entry.value == null }?:entry.value
            AndroidView(
                factory = { remoteTextureView!! },
                modifier = Modifier.size(Dp(180f), Dp(240f))
            )
            mEngine.setupRemoteVideo(
                VideoCanvas(
                    remoteTextureView,
                    Constants.RENDER_MODE_HIDDEN,
                    entry.key
                )
            )
        }
    }
}
这里的 remoteListInfo 就是我们维护的 remoteUserMap,如果远端视图有新用户加入频道,我们就使用 row 来添加纹理视图。
添加好本地视图和远端视图之后,我们就有了一个完整的视频直播推流应用啦。
我们可以通过添加控件来为应用添加下列基本功能:
- 静音/取消静音
- 关闭/打开摄像头
- 挂断通话
@Composable
private fun UserControls(mEngine: RtcEngine) {
    var muted by remember { mutableStateOf(false) }
    var videoDisabled by remember { mutableStateOf(false) }
    val activity = (LocalContext.current as? Activity)

    Row(
        modifier = Modifier.fillMaxSize().padding(bottom = 50.dp),
        Arrangement.SpaceEvenly,
        Alignment.Bottom
    ) {
        OutlinedButton(
            onClick = {
                muted = !muted
                mEngine.muteLocalAudioStream(muted)
            },
            shape = CircleShape,
            modifier = Modifier.size(50.dp),
            contentPadding = PaddingValues(0.dp),
            colors = ButtonDefaults.outlinedButtonColors(backgroundColor = if (muted) Color.Blue else Color.White)
            ) {
            if (muted) {
                Icon(Icons.Rounded.MicOff, contentDescription = "Tap to unmute mic", tint = Color.White)
            } else {
                Icon(Icons.Rounded.Mic, contentDescription = "Tap to mute mic", tint = Color.Blue)
            }
        }
        OutlinedButton(
            onClick = {
                mEngine.leaveChannel()
                activity?.finish()
            },
            shape = CircleShape,
            modifier = Modifier.size(70.dp),
            contentPadding = PaddingValues(0.dp),
            colors = ButtonDefaults.outlinedButtonColors(backgroundColor = Color.Red)
        ) {
            Icon(Icons.Rounded.CallEnd, contentDescription = "Tap to disconnect Call", tint = Color.White)

        }
        OutlinedButton(
            onClick = {
                videoDisabled = !videoDisabled
                mEngine.muteLocalVideoStream(videoDisabled)
            },
            shape = CircleShape,
            modifier = Modifier.size(50.dp),
            contentPadding = PaddingValues(0.dp),
            colors = ButtonDefaults.outlinedButtonColors(backgroundColor = if (videoDisabled) Color.Blue else Color.White)
        ) {
            if (videoDisabled) {
                Icon(Icons.Rounded.VideocamOff, contentDescription = "Tap to enable Video", tint = Color.White)
            } else {
                Icon(Icons.Rounded.Videocam, contentDescription = "Tap to disable Video", tint = Color.Blue)
            }
        }
    }
}
完成啦~~~
总结
使用 Jetpack Compose 创建视频直播推流应用就是这么简单~~
如果你使用我上面分享的代码来进行操作,你会获得一个像下图这样的 UI:
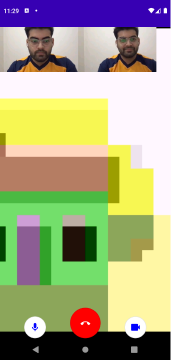
使用 Jetpack Compose 创建的可扩展视频直播推流应用
你可以点击这里查看应用的完整代码。
其他资源
想了解更多关于安卓版声网Agora SDK 和其他用例的信息,请点击这里查看开发者指南(安卓SDK)。
你也可以点击这里查看文中提到的函数的完整文档并查看更多函数哦~
原文作者:Meherdeep Thakur
原文链接:Live Video Streaming with Jetpack Compose and the Agora Android Video SDK